Are you tired of using the default 404 page template? The 404 error is the most common WordPress error you will encounter on the platform. It will happen to every website and it is so common search engines will not hold it against you if you fix it in a timely manner. By default, there is a 404 page template that is used when the error happens.
It is just a white page that says “Not Found” and won’t have much else to offer visitors. You can customize this page to display whatever you want and there are many ways to do it. Today, I will demonstrate how to spruce up your 404 page template with the WordPress Popular Posts plugin in WordPress.
Why Do You Need a Custom 404 Page
404 pages are very common, so common that WordPress has a built-in page for the error. Website design becomes more important every day because it is the biggest way to stand out from the competition. There are multiple ways to create cool custom 404 pages with plugins. Many web developers use 301 redirects to lead people away from the 404 page, but it doesn’t mean you shouldn’t take the time to create one.
When a visitor encounters a 404 page, they are most likely annoyed because they cannot find what they are looking for. You need to create a page that will calm them down, redirect them to other content to enjoy, apologize for the inconvenience and look good while doing so. This can be easily accomplished with some simple code editing.
How to Spruce Up Your 404 Page Template in WordPress
Today, I will demonstrate how to spruce up your 404 page template with the WordPress Popular Posts plugin in WordPress. This plugin is extremely popular with over 300,000 active installs and makes adding content to your 404 page extremely easy. There are multiple options to choose, but I will only demonstrate a few options so you can learn the process. You will not need any coding experience to do this, but it will speed up the process if you have some.
Since you will be editing code on your WordPress website, it is a good idea to backup your WordPress website now. This will ensure that if a mistake is made, you can revert your website to before it happened.
Installing WordPress Popular Posts
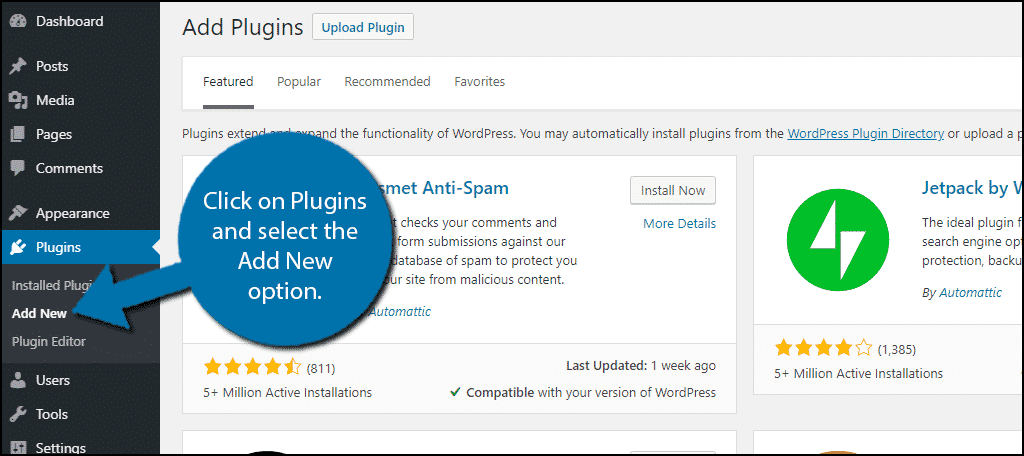
Start by clicking on Plugins and selecting the Add New option on the left-hand admin panel.
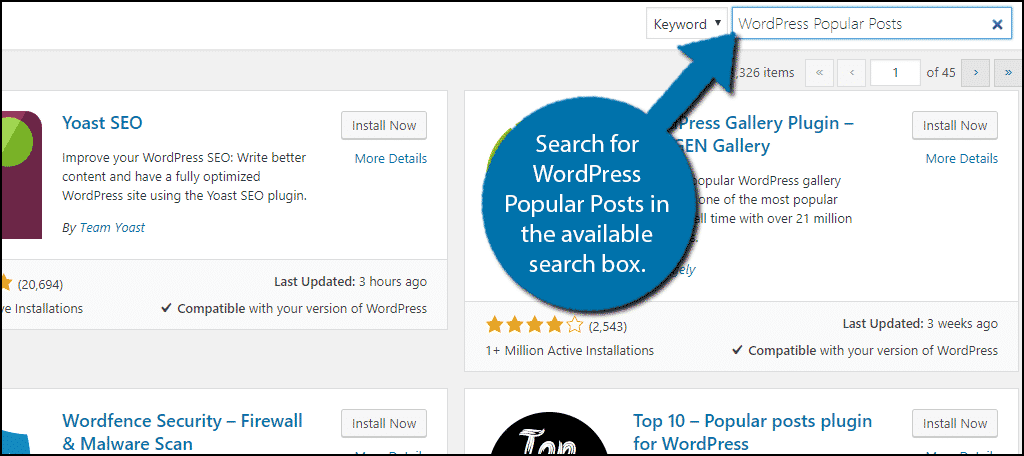
Search for WordPress Popular Posts in the available search box. This will pull up additional plugins that you may find helpful.
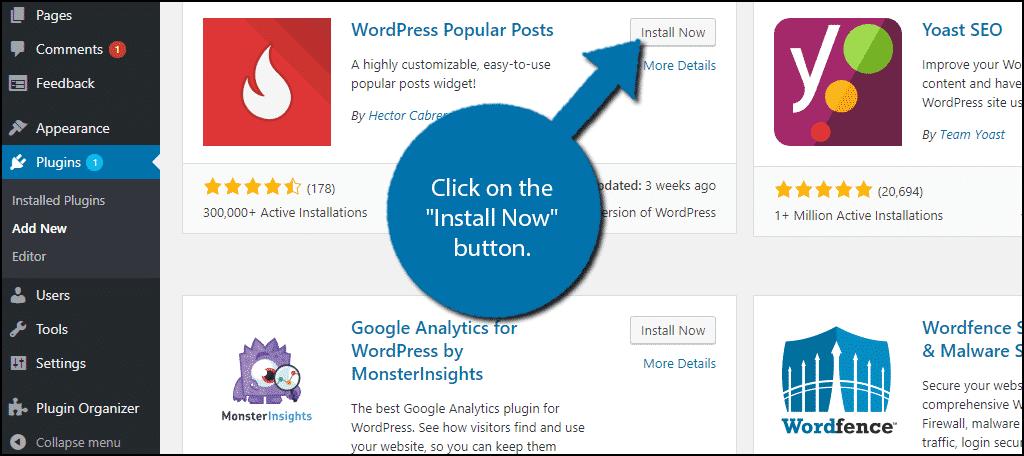
Scroll down until you find the WordPress Popular Posts plugin and click on the “Install Now” button and activate the plugin for use.
You will not need to change any settings, instead, you will simply need to add the plugin tag to the file you want to use it in. In our case, it will be the 404.php file, which we will look at next.
Finding Your 404.php File
Before you begin designing, it is a good idea to make a plan. You will want to add some content to the page, remember your visitors are not finding what they want, and they are very likely to look elsewhere. The question is what kind of content do you want to add to the page? There are lines of code you can use that can add almost any type of content to this template.
Let’s start by logging into the cPanel and clicking on the File Manager option. The File Manager will allow you to access all of the files related to your website.
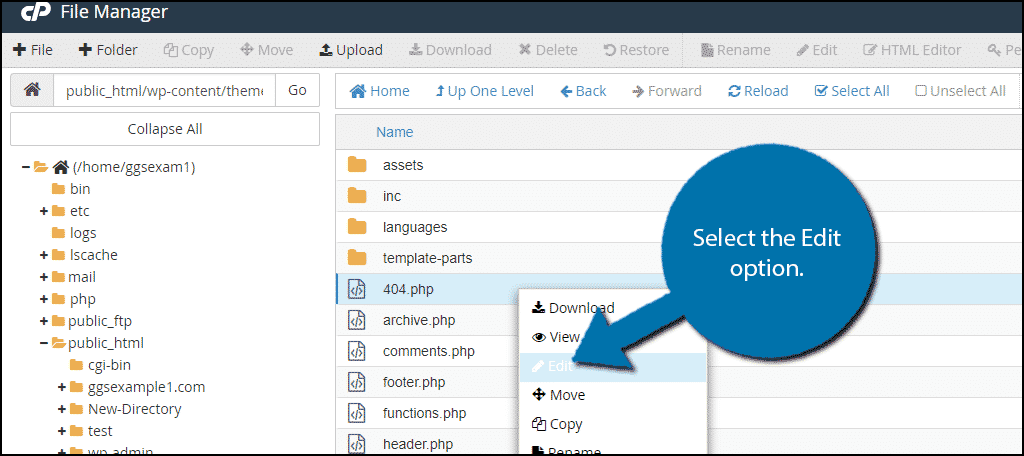
You need to locate your theme’s 404.php file. Click on the public_html directory, then click on the wp-content folder. Inside of this folder, you will find all of the content related to your website. Click on the themes folder and enter the folder of the theme you are currently using. Finally, right-click on the 404.php file and select the Edit option.
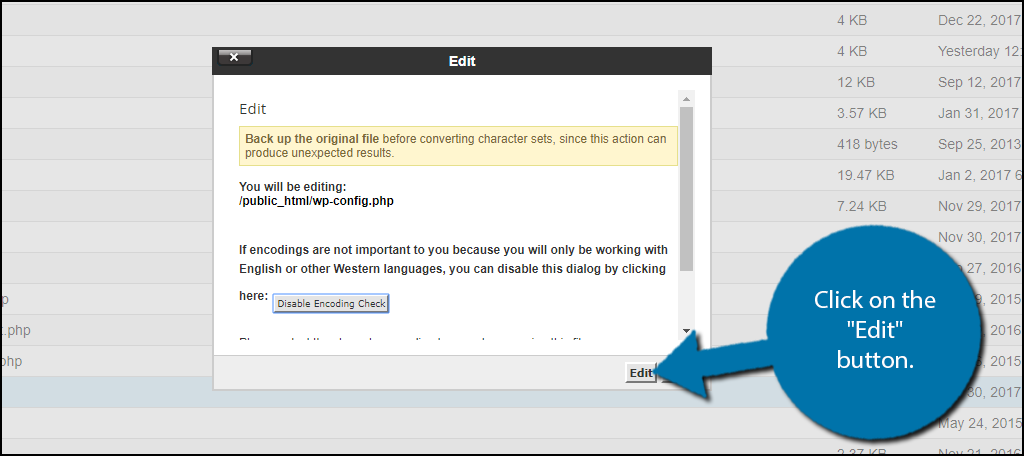
A pop-up window will show up. This box will warn you to create a backup of your files before editing anything. This will ensure that you can revert your website back to when it was working if something goes wrong. Click on the “Edit” button. A new tab will open containing all of the code from the file.
In this file, you can directly edit what will appear on your 404 page. There are plenty of things you can do with this page (it’s the same as customizing other WordPress pages). Before you continue on, let’s add the following line into the 404.php file to get the plugin working:
This is the generic code format you will be using to call posts into the template. The following lines of code are only variations. Any of the codes that are listed below must be placed where you want them to appear. For example, if you want them in the header, place them in the header, if you want them in the body, place the code in the body portion of the page. The naming conventions are different depending on the theme you choose.
Adding Content to Your 404 Page
Keep in mind that every theme is different and that your theme’s default template may include some of these things already. Make sure not to include the same content twice.
So you may want to display other content pieces to display on your page, which is a great idea. The problem is choosing what to show. Here are some example lines that will display different types of content:
Recent Posts: What’s better than advertising your newest content? Simply add this line of code to show your most recent posts:
 'postbypost', 'limit' => 10, 'format' => 'custom', 'before' => '', 'after' => '
' ) ); ?>
Random Posts: Perhaps you’re having a hard time deciding what to show on the page. This code will show 5 random posts on your 404 page:
Most Talked About Content: Try pointing your visitors to your most commented content. Use the following code to display your most talked-about content:
Once you have inserted the code into the 404.php file, click on the “Save Changes” button to finish.
These additions will certainly give your visitors other content to look at while you work on fixing that 404 error. In case you’re wondering how to actually check what your 404 page looks like, simply go to a page that doesn’t exist like:
www.yourURLhere.com/qwerty
Just make sure the page doesn’t actually exist on your website and you can view the changes you have made to your 404 page.
Make Every Part of Your Website Fun to Explore
Beginning web developers think that keeping visitors away from the 404 page is the best way to handle the matter, but without a doubt, your visitors will visit the 404 page at some point. It is an error that every website encounters and you need to prepare for it. Take the time to customize this page because it can help you build a strong content-rich website.
What kind of content have you included on your 404 page? Do you find anything in this guide too difficult?