Not everyone across the globe speaks the same language. What if you want to market your business to those in a different country? This is when setting up WordPress to be multilingual would be beneficial. Instead of forcing visitors to understand your primary language, they can choose their own.
One of the best parts of WordPress is how it offers a great deal of customization. From a single platform, you can incorporate a variety of languages without rebuilding the same site over and over again. In this tutorial, we’re going to show you how that is done.
Why offer Multilingual Support on Your Site?
The Internet spans the entire globe. This is why it’s referred to as the “world wide web.” Visitors across the planet could be looking at your material right now. Unfortunately, you will miss an opportunity to engage these users if they can’t understand the content.
An eCommerce site that ships worldwide is a great example of needing multilingual support. Instead of focusing on a single society for sales, engaging audiences from other countries will expand business practices. As a result, the site has potential to increase sales depending on the location.
Even a blogger hosting a personal website could benefit from offering additional languages. As many blog owners rely on ad revenues and affiliate marketing platforms for income, engaging a wider audience equals a greater opportunity to make money.
Using Automatic Google Language Translator for Your Website
The fastest way to add multilingual support for your WordPress website is to use Google Language Translator. This is a quick and easy plugin that incorporates Google’s translation matrix into your website.
To use Google Language Translator:
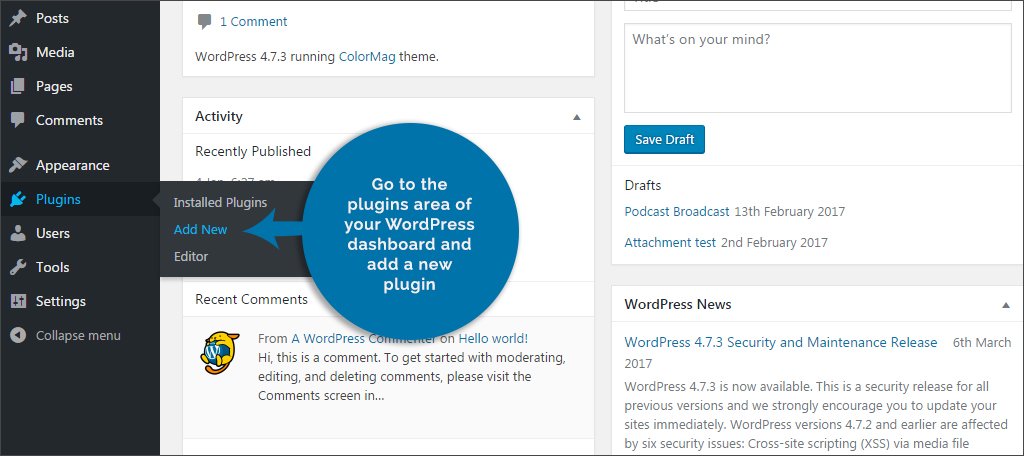
Go to the plugins area of your WordPress dashboard and add a new plugin.
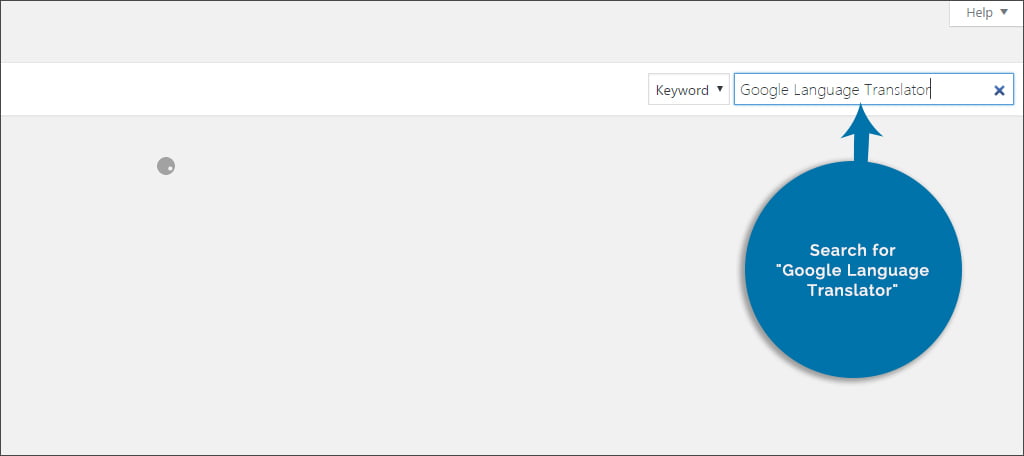
Search for “Google Language Translator.”
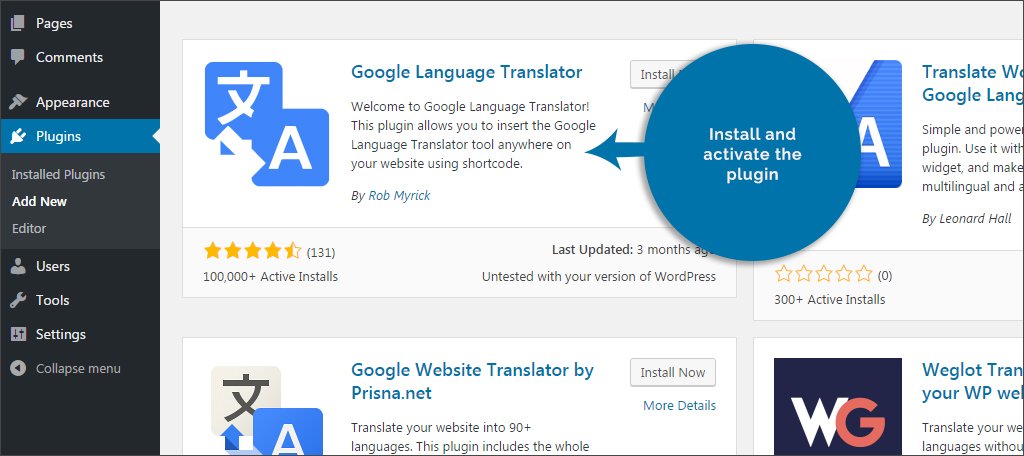
Install and activate the plugin.
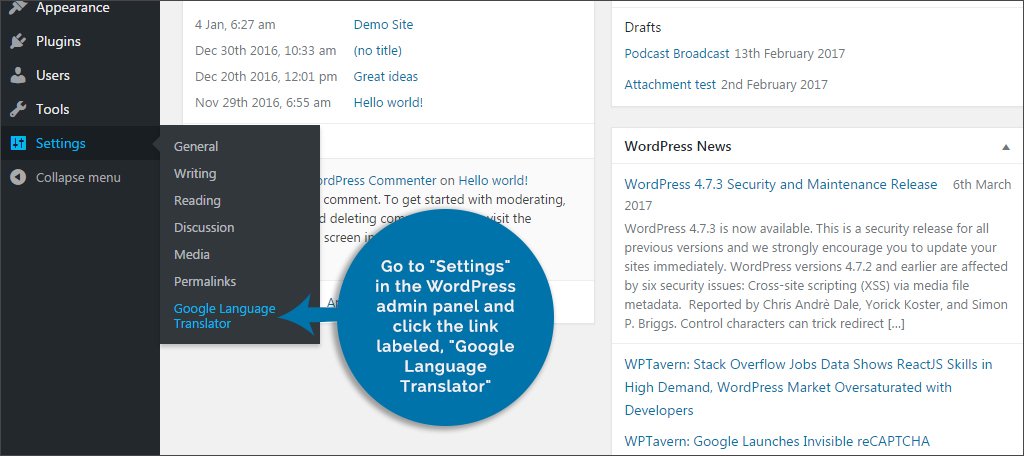
Go to “Settings” in the WordPress admin panel and click the link labeled, “Google Language Translator.”
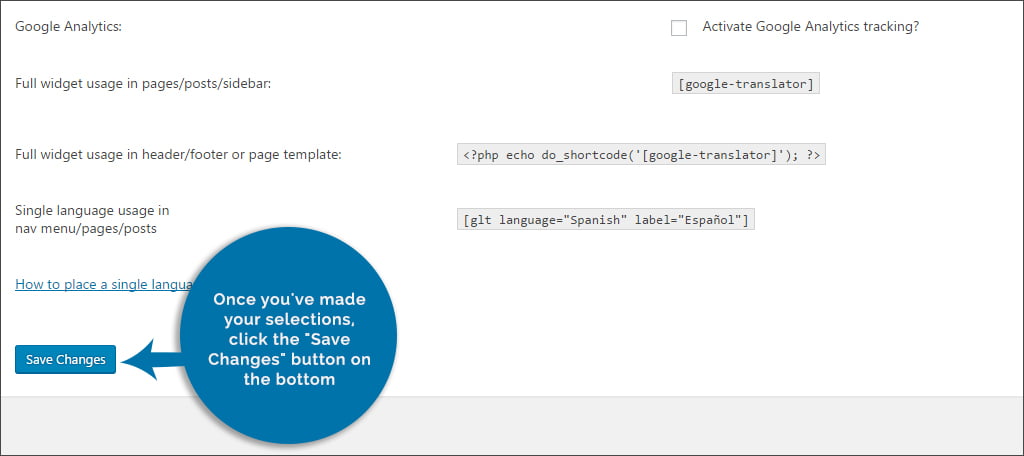
This plugin comes with a wide range of settings to choose from. You can add individual flags to your site to indicate translation or use Google’s drop down window. You can also modify the flag size, show the Google Toolbar, branding and even Google Analytics tracking for the translation.

NOTE: This plugin also comes with shortcodes that can be added to any post or page on your website.
Once you’ve made your selections, click the “Save Changes” button on the bottom.
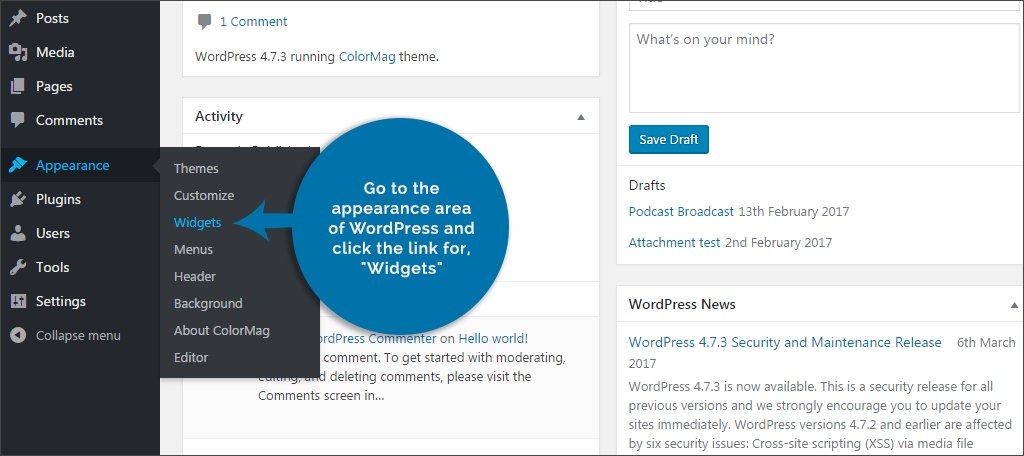
Go to the appearance area of WordPress and click the link for, “Widgets.”
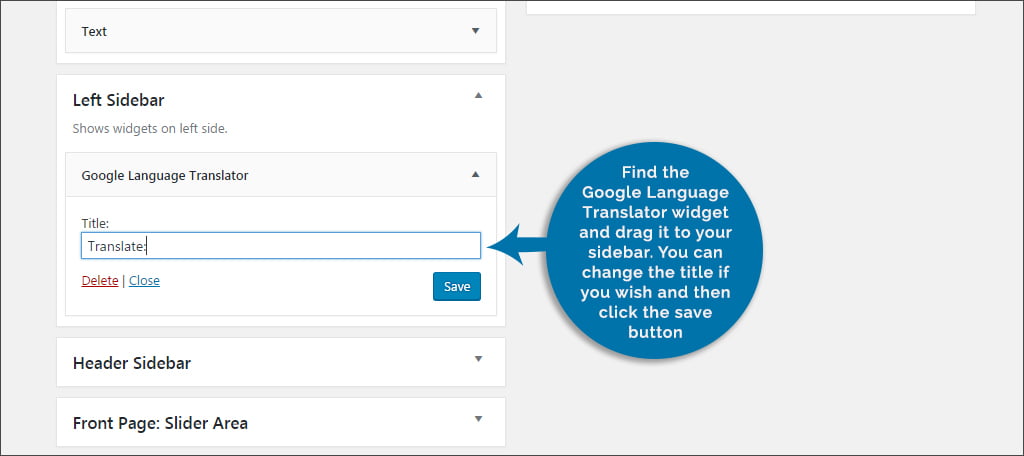
Find the Google Language Translator widget and drag it to your sidebar. You can change the title if you wish and then click the save button.
That’s all there is to it. Now, your entire website will use Google’s translator to convert the text.
Using Polylang to Manually Add WordPress Multilingual Functionality
Some people would rather have control over what is being translated rather than using an automated system. This can help remove confusion as sometimes words don’t get translated perfectly through software or automatic plugins.
For this tutorial, we’re going to show you how to add the Polylang plugin to your website. We’re using this plugin because of how many optional plugins can integrate with the system. For example, you can use a secondary plugin to connect Polylang to WooCommerce.
To use Polylang:
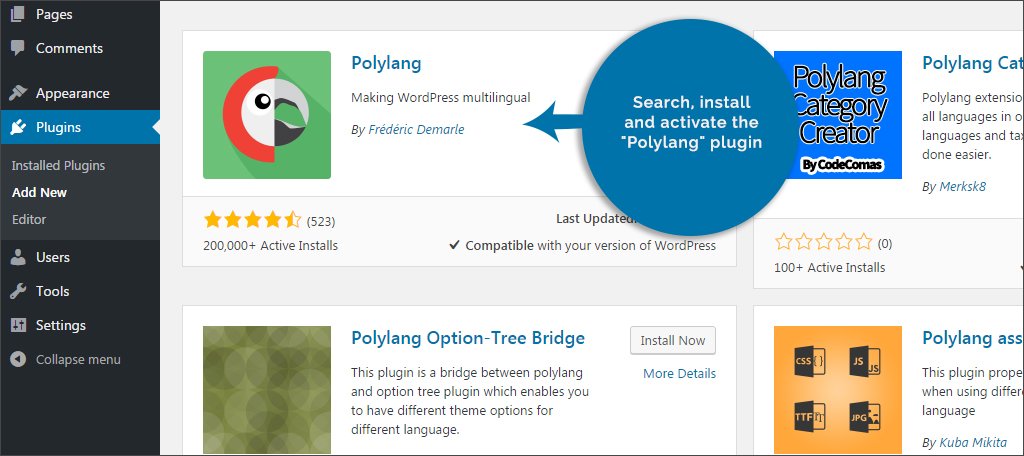
Search, install and activate the “Polylang” plugin.
NOTE: There will be a number of add-on plugins for Polylang. Make sure you select the one by Chouby.
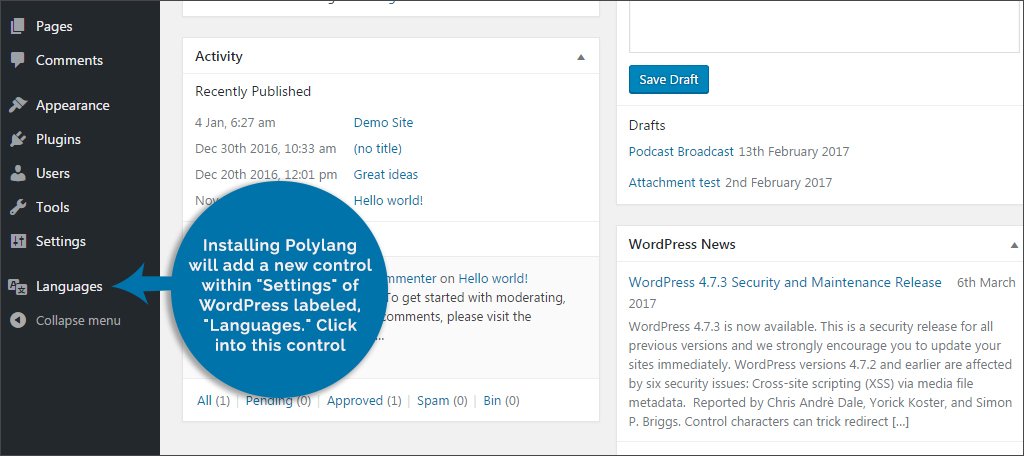
Installing Polylang will add a new control within “Settings” of WordPress labeled, “Languages.” Click into this control.
The first tab you’ll notice is “Languages.” Using the drop down list, choose a language you wish to add to the website. For this example, we’re going to select “Español – es_ES.”

Full name: This will display the full name of the language selected. However, you can change this to anything you wish.
Locale: The locale will also automatically set when you choose a language. As you can have various dialects, you need to make sure you’re providing the correct translation for your target audience.
Language code: This is another option that will set automatically. Note the “es” represents the language as Español, ie. Spanish.
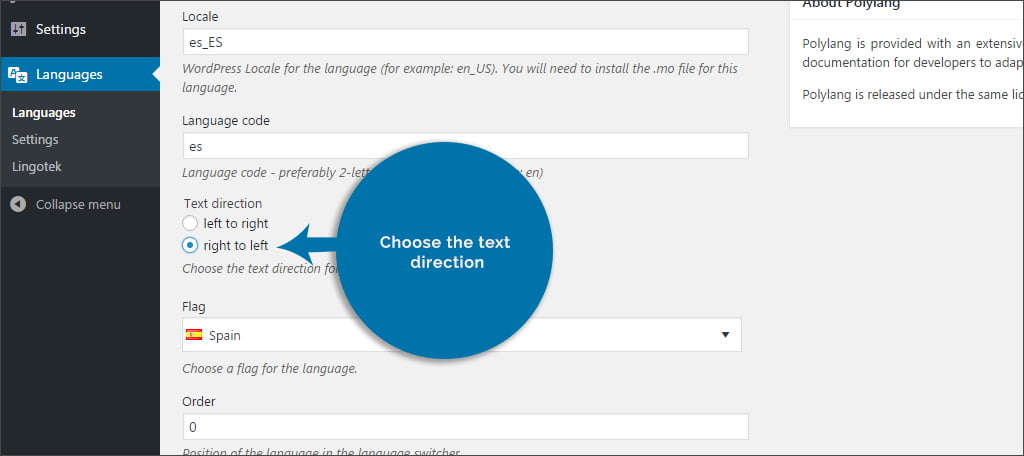
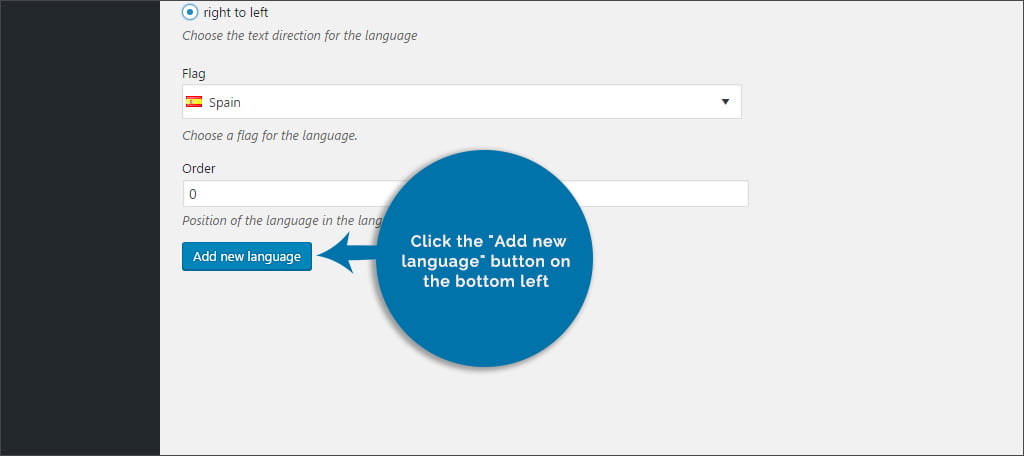
Choose the text direction. Most interpretations read from left to right. However, you can choose to set this to “right to left” in the event of some languages.
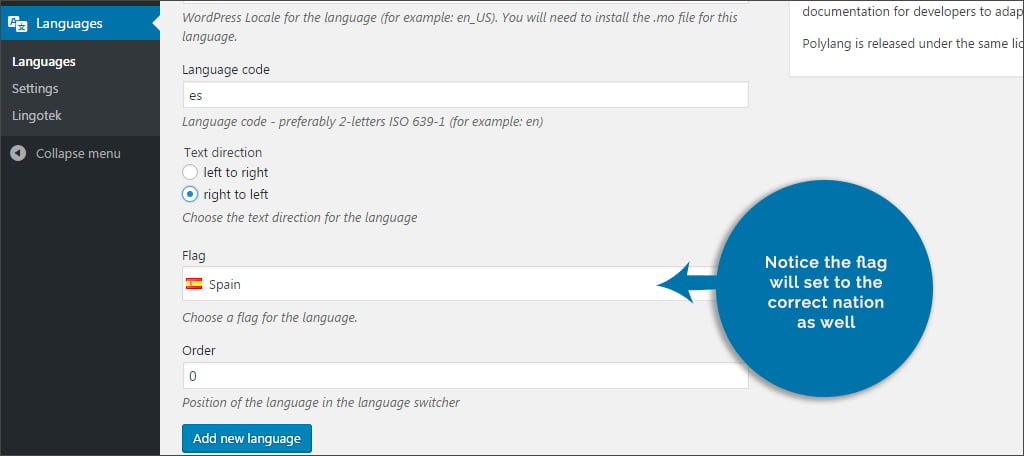
Flag: Notice the flag will set to the correct nation as well. This is the universal way to switch languages on the Internet and plays into how the widget performs, which we will cover in a moment.
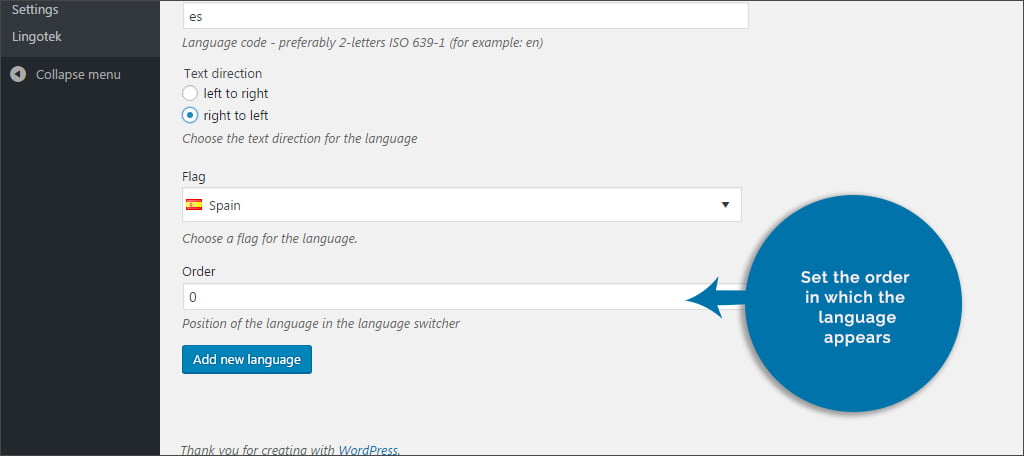
Order: Set the order in which the language appears. Starting from “0,” you can arrange languages to appear in any order. For now, we’re going to leave it as the default.
Click the “Add new language” button on the bottom left.
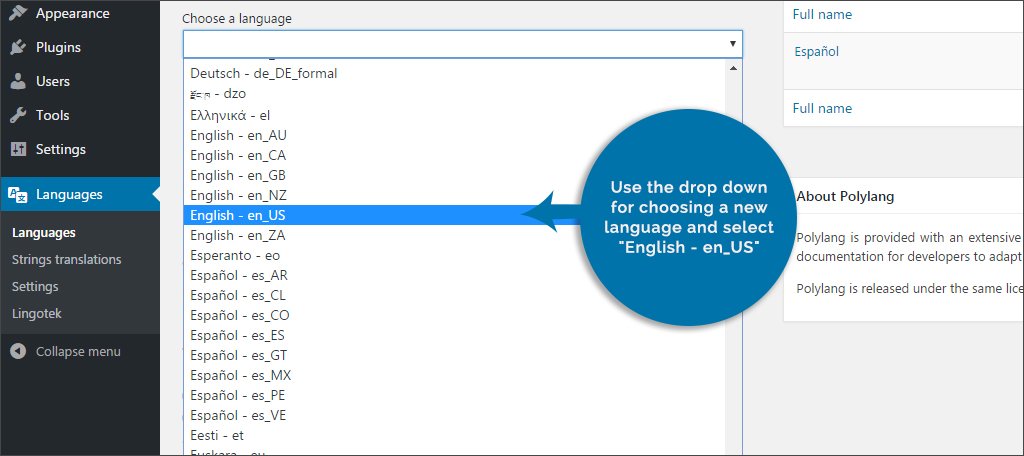
Use the drop down for choosing a new language and select “English – en_US.”
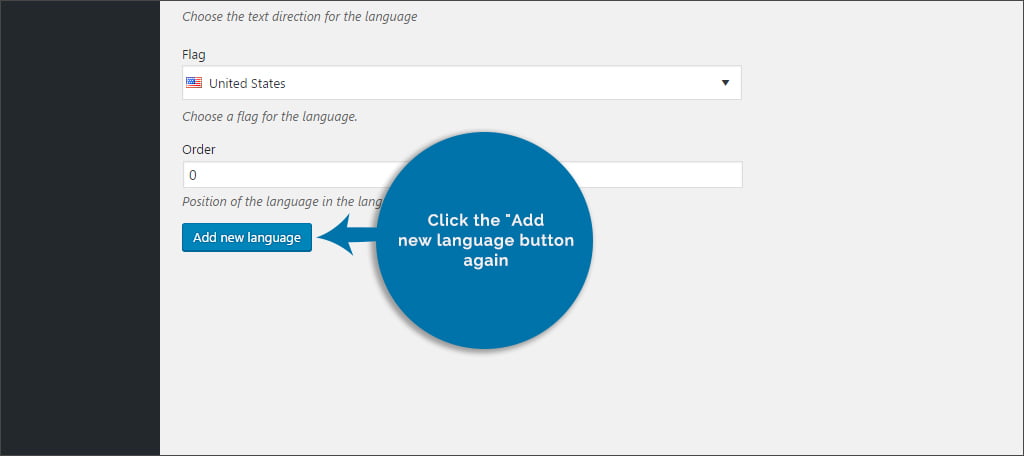
Click the “Add new language button again. Now, the website supports both Argentinian Spanish and American English.
In the list of supported languages on the right, set the default language of the website by clicking its star icon.
![]()
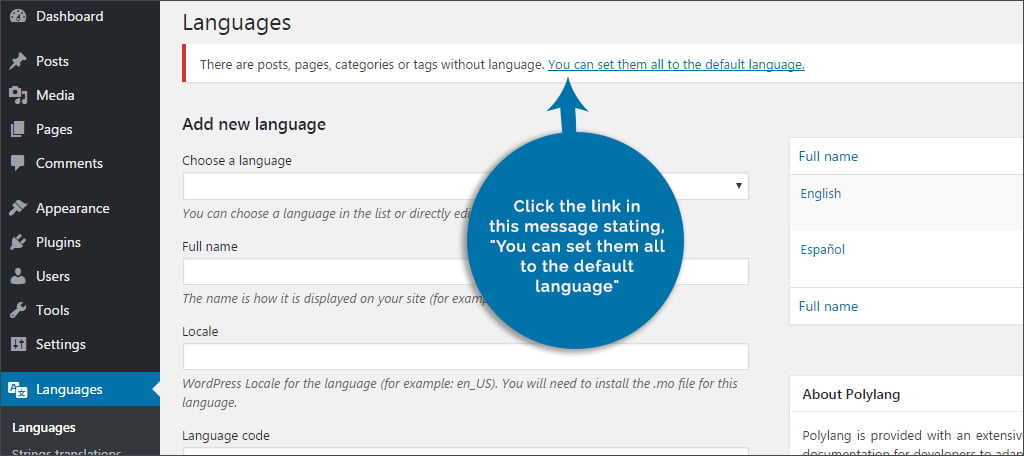
You’ll notice an error message on the top of the Language settings page informing you there are posts, pages, categories and tags without a language assigned. Click the link in this message stating, “You can set them all to the default language.” This will save you a lot of time, especially if you have a lot of content on the website.
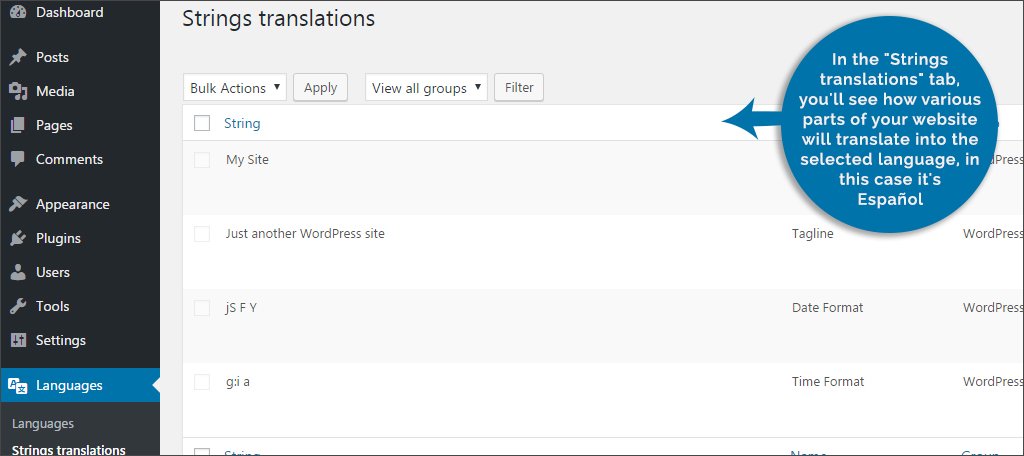
In the “Strings translations” tab, you’ll see how various parts of your website will translate into the selected language, in this case it’s Español. These strings can be changed at any time, but we’re going to leave them be for now.
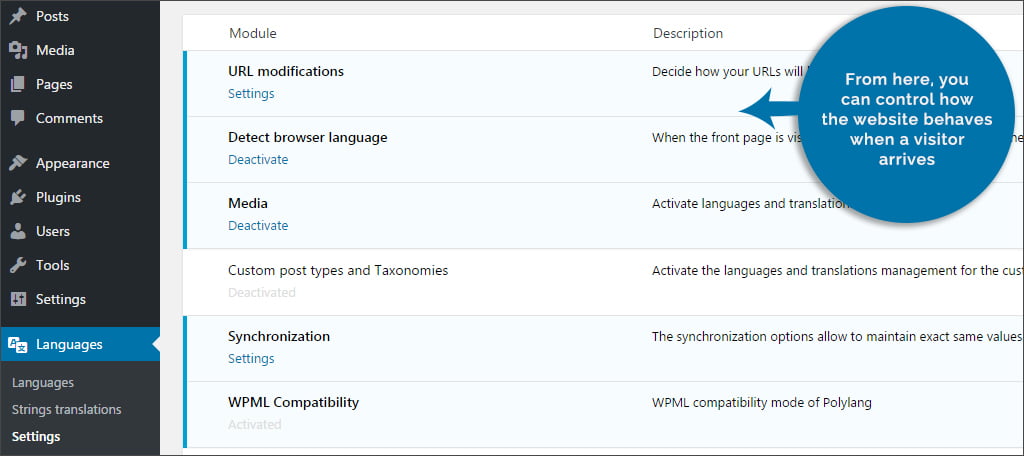
Next, click on the “Settings” tab in Polylang. From here, you can control how the website behaves when a visitor arrives.
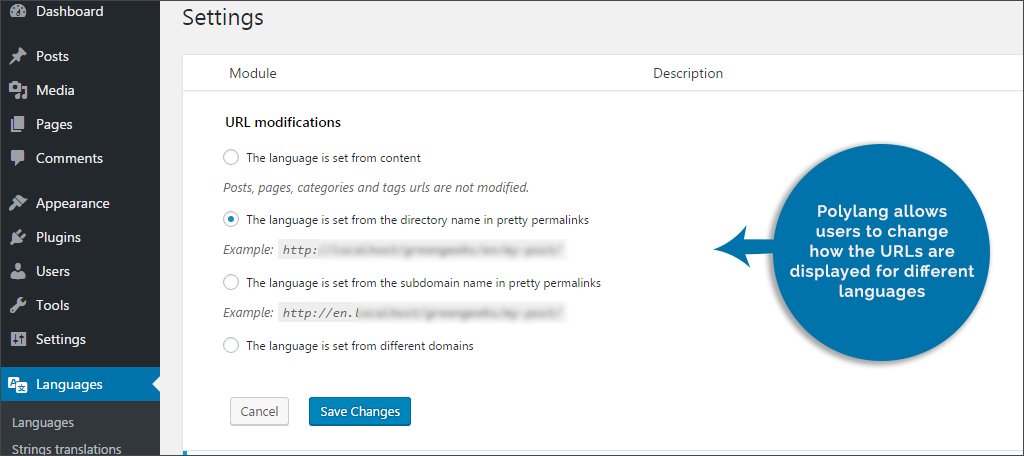
URL Modifications: Polylang allows users to change how the URLs are displayed for different languages. By default, URLs are set to use pretty permalinks while removing the language code. Click the radio button for, “The language is set from content.” This prevents Polylang from making changes to the URL addresses of your posts and pages.
NOTE: Changing how the URLs are set up could lead to breaking links later should the plugin be removed.
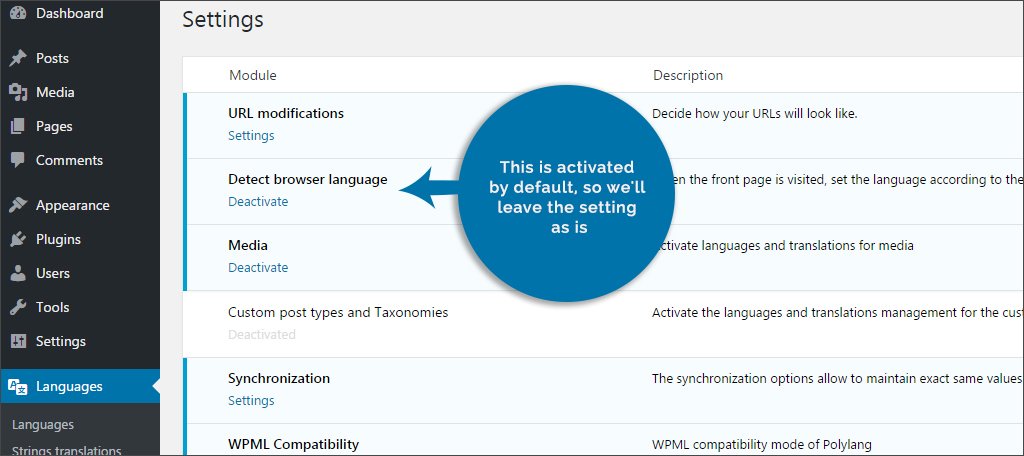
Detect browser language: This is self-explanatory. When someone visits the website, Polylang will detect what to display based on the preferences of the user’s browser. This is activated by default, so we’ll leave the setting as is.
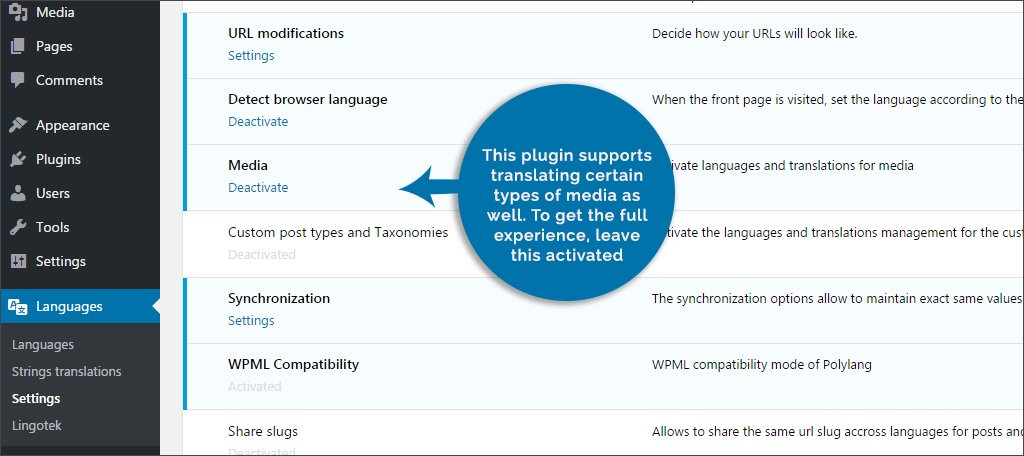
Media: This plugin supports translating certain types of media as well. To get the full experience, leave this activated.
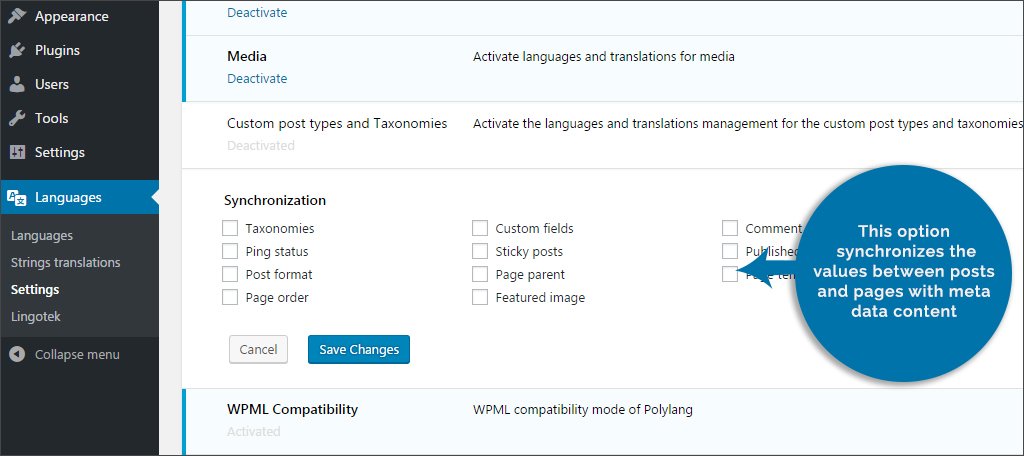
Synchronization: This option synchronizes the values between posts and pages with meta data content. For now, we’ll leave these blank. However, you may want to use them later on depending on your objectives.
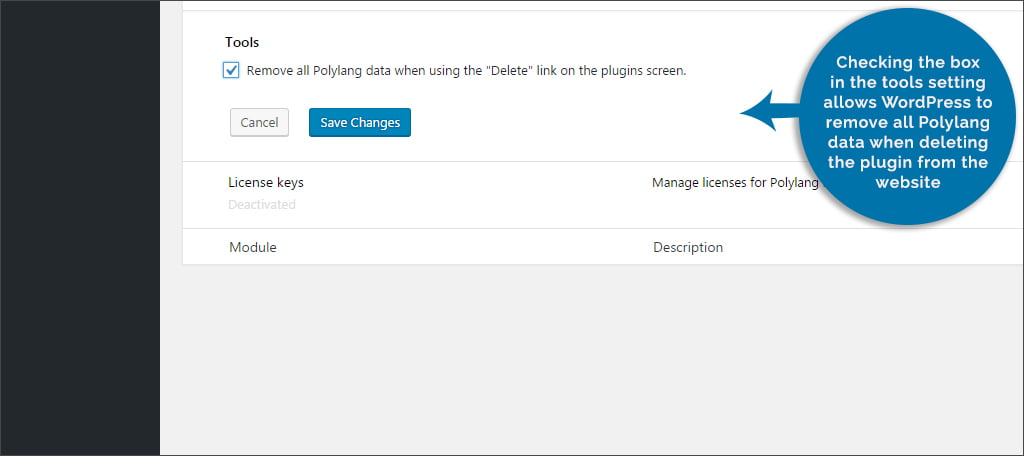
Tools: Checking the box in the tools setting allows WordPress to remove all Polylang data when deleting the plugin from the website. Otherwise, WordPress will store that information permanently. This data may be useful should you decide to install Polylang again at a later date.
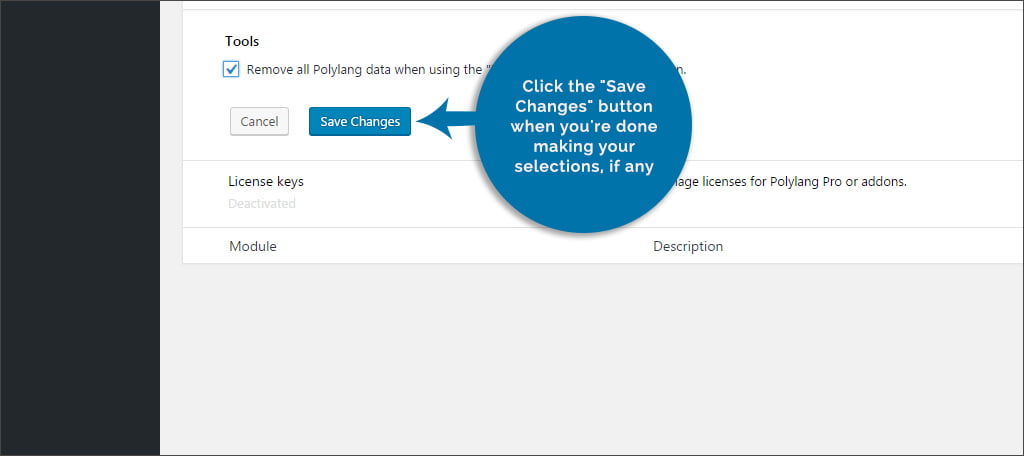
Click the “Save Changes” button when you’re done making your selections, if any.
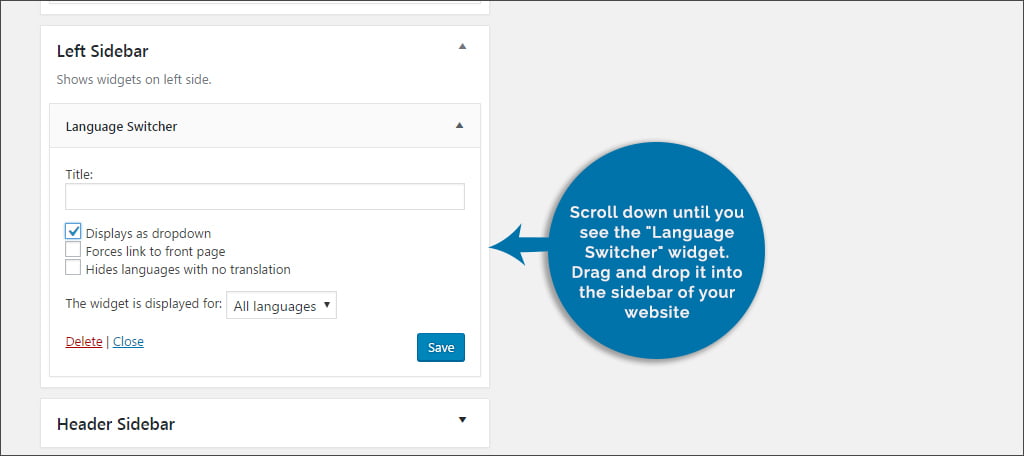
Go to the appearance area of the WordPress dashboard and click the link for, “Widgets.”

Scroll down until you see the “Language Switcher” widget. Drag and drop it into the sidebar of your website. This gives visitors a way to change the language manually. This widget has a few settings you can change depending on how you want it to appear. For instance, you can check the box to display the switcher as a drop down menu.
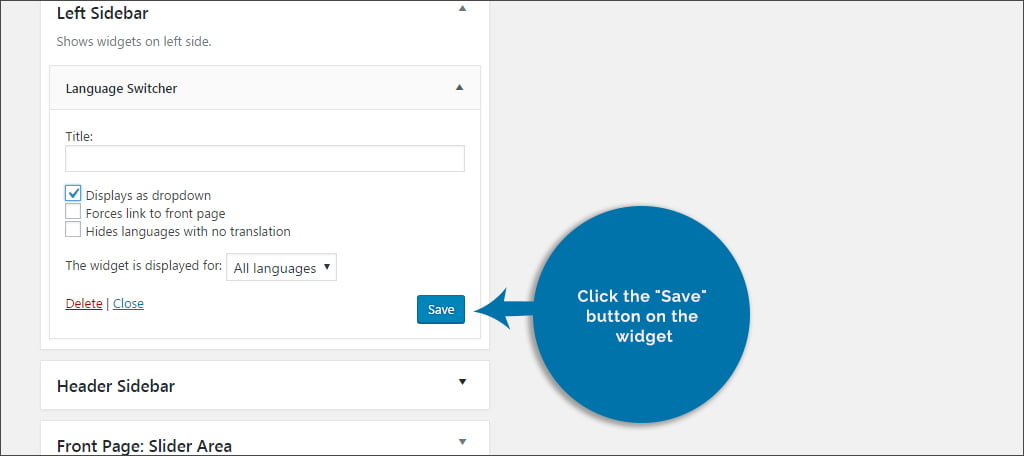
Click the “Save” button on the widget.
NOTE: This plugin does not translate your content automatically. You will need to create new pages of each post and page with the corresponding language. This can be easily done as Polylang will show when a post or page needs a translated counterpart using a check mark or a plus sign in the “Posts” or “Pages” screen of WordPress.
Whether you want an automatic translation of the site or would rather do the conversion manually, it’s relatively easy for WordPress to be multilingual. This can save time creating completely separate sites for different languages while allowing you to engage an audience from all over the world.
What kinds of additions do you implement to connect with your audience? Do you find people from other countries visiting your content?