In this article, we’re going to cover some of the first steps involved in getting your GreenGeeks VPS account up and running.
- Logging In to WHM
- Configuring Nameservers
- Creating Your First Website Account
- Changing the Name Servers in WHM
- Configuring Your VPS Hostname A Record
- Setting Up Hosting Packages
- Creating cPanel (Website) Accounts
- Setting Up Email Addresses
This guide assumes that you’ve just opened a GreenGeeks VPS account and are starting from scratch.
Logging In to WHM
When you open a GreenGeeks Managed VPS or Reseller account, you get access to WHM and cPanel. WHM is used to set up the cPanel accounts, and the cPanel accounts are used to manage the individual sites on the server.
The easiest way to log in to WHM is to log into GreenGeeks. In the “Quick Server Login” section, click the “WHM” button for the VPS.

When WHM is set up, the only account is “root,” so that is the login username. The root password is in your account setup email. Once logged in, you can change the root password or create additional user accounts if you wish.
Note that if you change your root password in WHM, the “WHM” button in the “Quick Server Login” section of GreenGeeks will no longer log you in directly. You’ll have to enter the new password on the login page.
Logging In to WHM Using the Server IP Address
You can also log in to WHM without logging into GreenGeeks by using one of the IP addresses assigned to your VPS. So the URL would look like this:
The IP address can be found in the email you received from GreenGeeks when the account was set up. 2087 is the port number for WHM on the server.
Logging In to WHM Using Your Domain Name
Finally, once your domain name points to the VPS, you can connect to WHM using your domain name. Like https://whm.ggexample.com. In the event of an expired domain name or other configuration issues, you’ll always be able to connect to WHM using the IP address.
Detailed WHM documentation is available on the cPanel website. But let’s go over some of the basics to get you started.
Configuring Nameservers
We’re doing the nameserver configuration first since DNS changes can take some time to propagate.
In most cases, you’ll be using your own domain as a name server, so the domain has to be registered as a nameserver at the registrar.
If you registered the domain through GreenGeeks, here’s how to register the name servers.
If you did not register your domain through GreenGeeks, log in to your domain registrar’s control panel and look for a DNS setting called “private nameservers,” “Register DNS,” or “personal nameservers.” If you can’t find the setting, contact your registrar and ask them how to set up private nameservers.
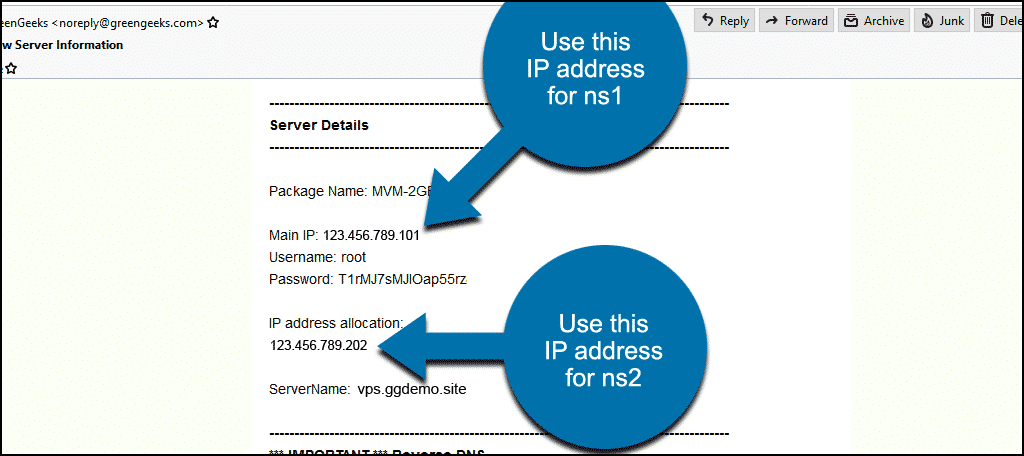
When registering your domain as a name server, the registrar will require IP addresses for the ns1 and ns2 subdomains. Use the IP address in your VPS account setup email for the nameservers. The “Main IP” will be used for both nameservers.
Once your domain is set up to work as a nameserver at your registrar, make sure the nameservers for your domain are changed to the private nameservers that you just created. So for this demonstration, we changed the nameservers for the ggdemo.site domain to ns1.ggdemo.site and ns2.ggdemo.site.
Then, we’ll go into WHM to add the new nameservers to our configuration.
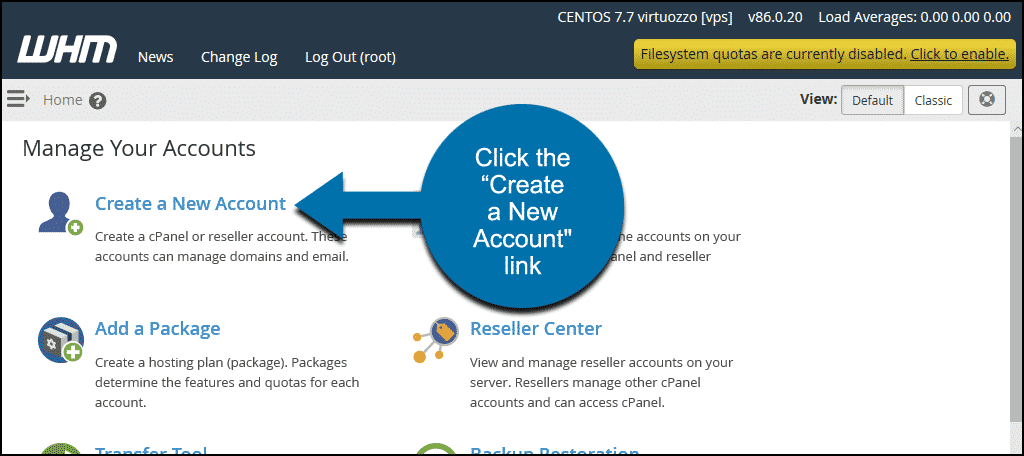
Creating Your First Website Account
The first site you have to create is the site for your primary domain. In our case, that’s ggdemo.site. Creating the primary domain site first ensures that your DNS zone is properly set up. That paves the way for creating additional accounts later.
Go back to the home page of WHM and click the “Create a New Account” link.
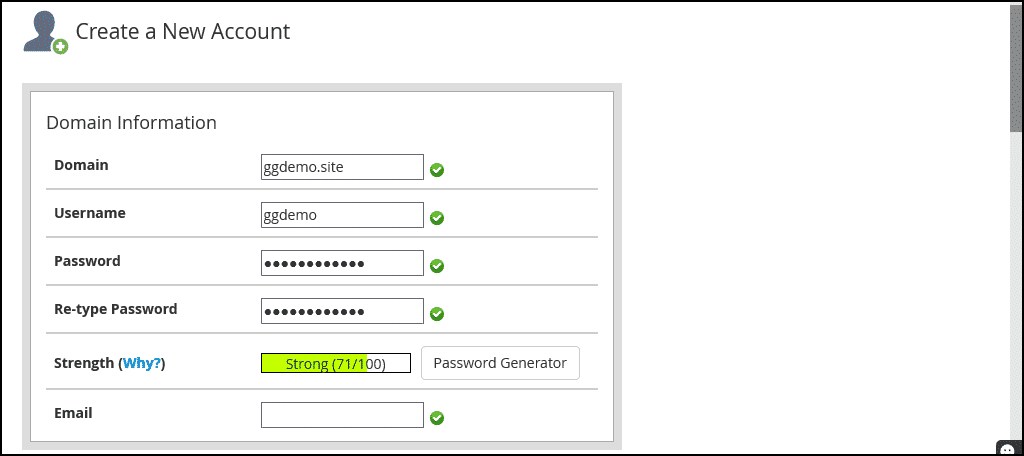
In the “Domain Information” section, enter your domain name and the username, password, and other information.
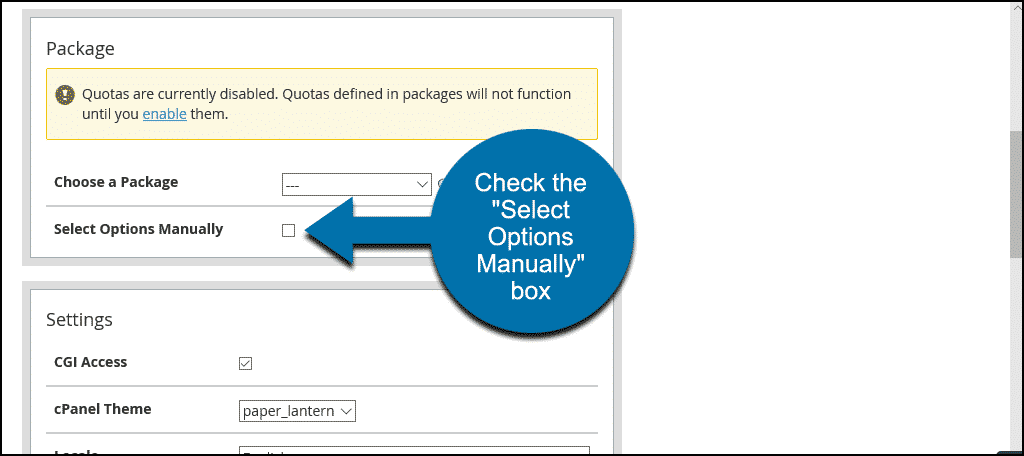
In the “Package” section, check the “Select Options Manually” box. We’re choosing that option because we haven’t set up any packages yet. If you have already set up packages, you can choose one here.
Scroll down through the “Manual Resource Options” and configure as you’d like. There’s no right or wrong here; it’s just a matter of your preferences.
Click the button at the bottom of the page to save the account.
When you create an account in WHM, a cPanel account is also created. You’ll use the cPanel account to manage the domain and website attached to the account. We have individual articles for most of the available cPanel tools.
Changing the Name Servers in WHM
Log in to WHM. You can log into GreenGeeks and click the “WHM” button in the “Quick Server Login” section, or use the IP address URL as we talked about earlier.
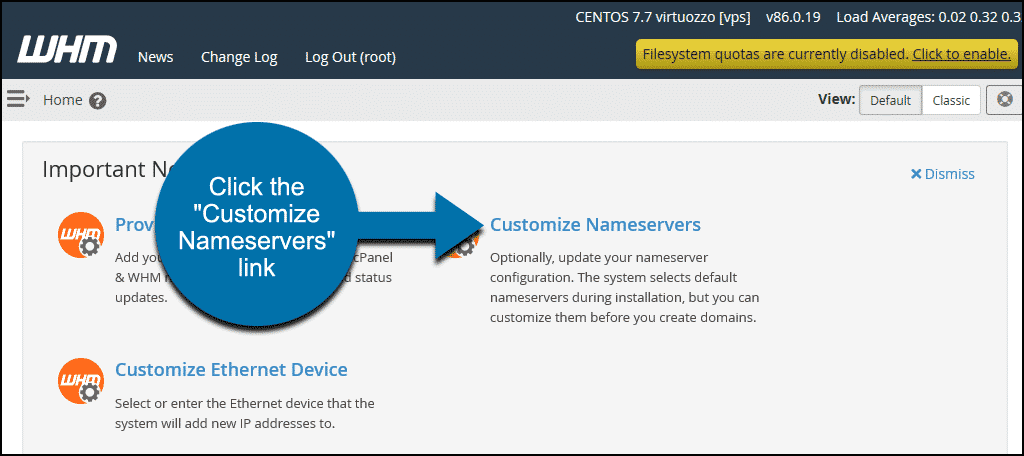
If the “Important Next Steps” section is displayed, click the “Customize Nameservers” link.
Or:
If you dismissed the next steps section or it isn’t displayed, click open the navigation.
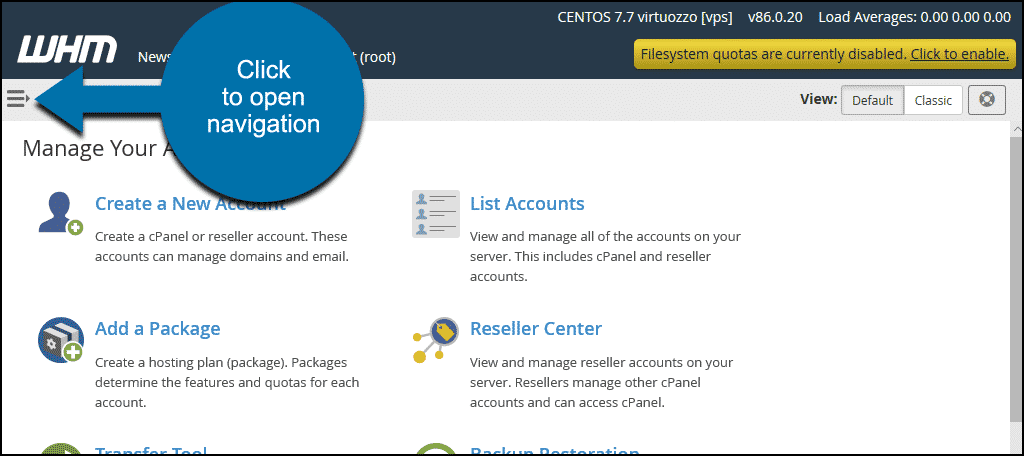
Then click the “Basic WebHost Manager Setup” link.

Then:
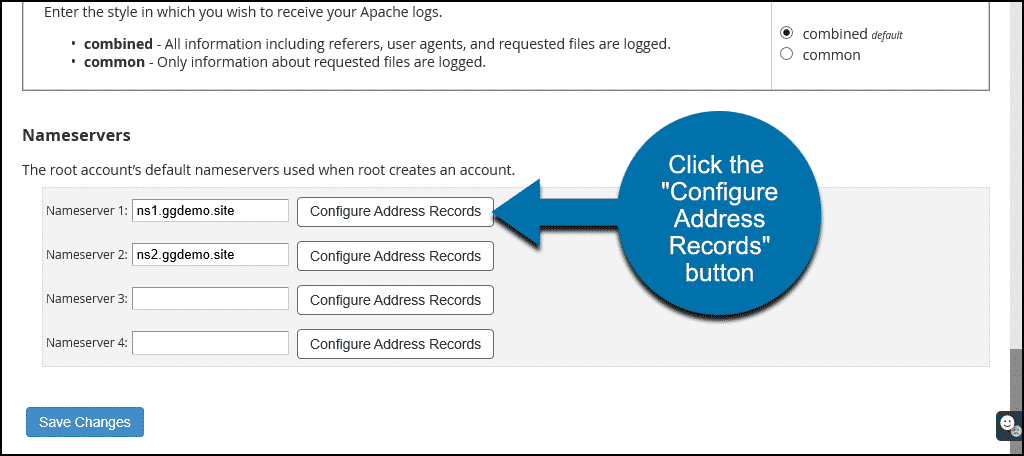
Scroll down to the “Nameservers” section.
Enter the name servers you set up at your domain registrar. For example, we’re using the ggdemo.site domain. We’ve set up the name servers at the registrar, so we’ll enter ns1.ggdemo.site and ns2.ggdemo.site.

Click the “Save Changes” button.

Now we’re going to add the A records for the nameservers. To do that, we’ll click the “Configure Address Records” button.
First, we’ll click the button for ns1 and add the “Main IP” address from the account setup email.
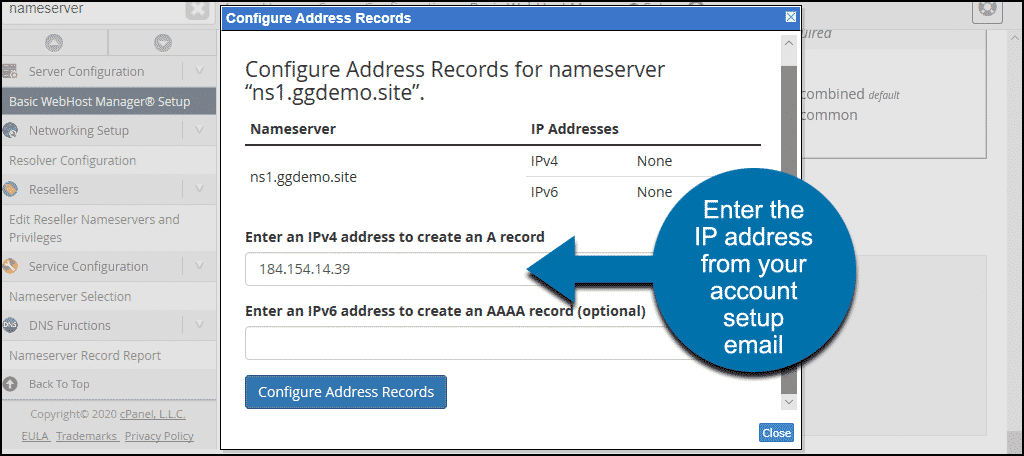
Then, click the “Configure Address Records” button.
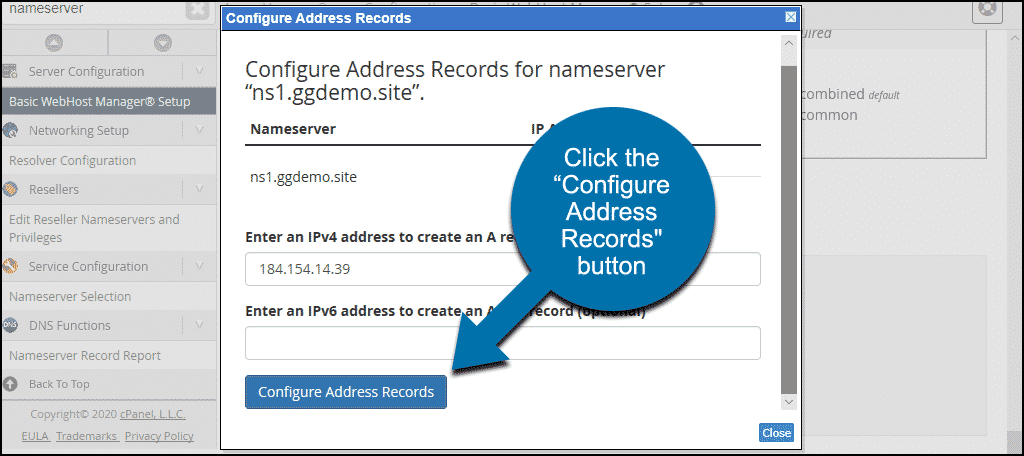
Next, repeat the process by clicking the “Configure Address Records” button for ns2, then enter the “Main IP” address from the account setup email again.
Click the “Save Changes” button again, and that should do it for nameserver setup.
Configuring Your VPS Hostname A Record
Log in to WHM, and in the left navigation, scroll down to the DNS Functions section.
Click the “Add an A Entry for Your Hostname” link.

In the “Please confirm the IP address…” box, enter the “main IP” address from your account creation email. Check the Configuring Nameservers section to see where the IP address is located in the email.
Click the “Add Entry” button.

Creating Hosting Packages
Your WHM license allows you to create one user. If you’ve already created that user and don’t intend to add other websites to your server, you can skip hosting package creation. To add more users and sites, you can upgrade your WHM/cPanel license.
If you intend to set up multiple accounts/websites on the server, you’ll want to create at least one hosting package. Hosting packages make the new site creation process quicker. If you don’t create any packages, you can still select options manually when you create new accounts, as we did in the previous section.
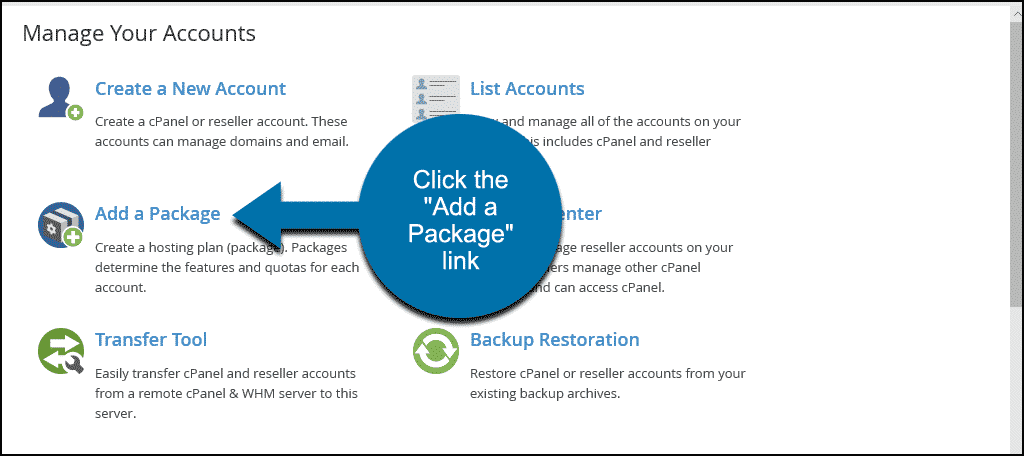
Go to the WHM home page and click the “Add a Package” link.
Enter a descriptive name in the “Package Name” field. That will make package selection more straightforward if you create multiple packages.
Complete the rest of the configuration options.
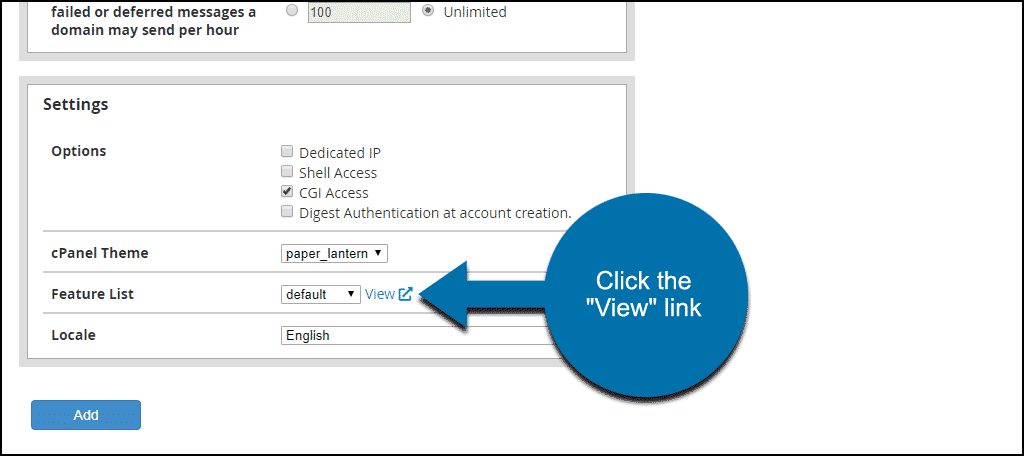
In the “Settings” section at the bottom of the page, there is a useful configuration option that you don’t want to overlook.
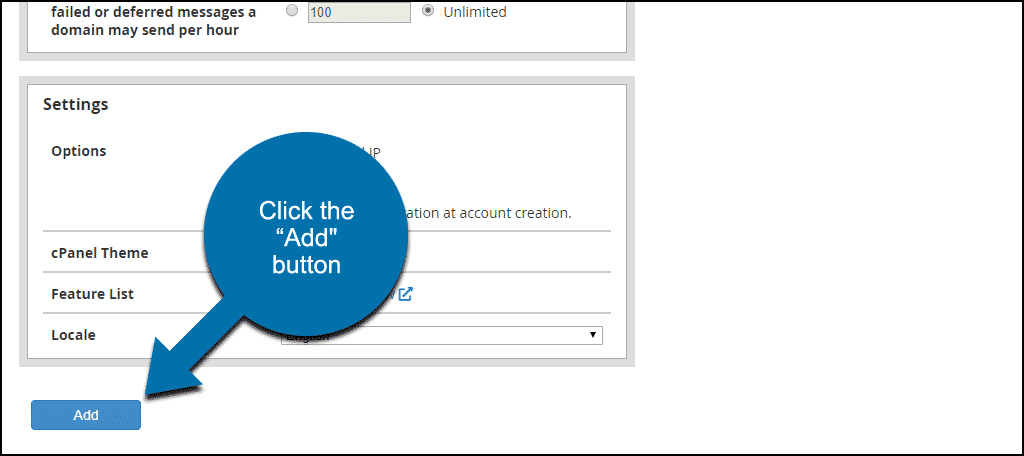
Click the “View” link next to the “Feature List” drop-down.
On the “Feature Manager” page that opens, you’ll see an extensive list of available package features. Toggle them on or off as desired by checking or unchecking the boxes. Then click the “Save” button.
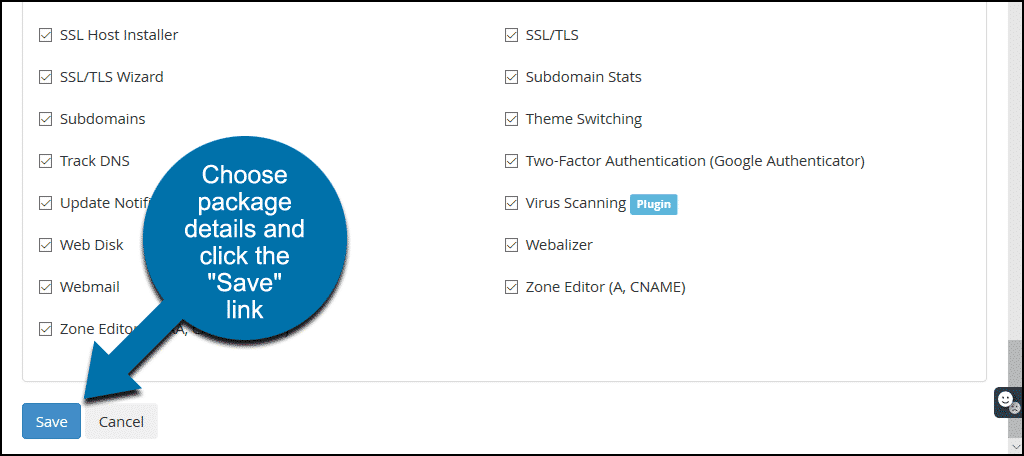
Back on the “Add a Package” page, click the “Add” button to complete the package set up.
Now when you create a new account, your package will appear in the “Choose a Package” drop-down.
Creating cPanel (Website) Accounts
Your WHM license allows you to create one user. If you want to add more users and websites, you can upgrade your WHM/cPanel license.
The process of creating additional accounts is the same as the steps we covered in the Creating Your First Website Account section. You can repeat them for any additional users/websites.
Remember, you can streamline the creation of new accounts by creating hosting packages.
Setting Up Email Addresses
We talked about using cPanel to manage individual domains and websites, and that’s where we’re going to go to set up email addresses.
You can get to cPanel in one of three ways:
- Log in to WHM, click the “List Accounts” link, then click the cPanel link or logo for the site you’d like to log in to.
- Use your server IP address with the cPanel port number (2083) at the end of the URL. Like: https://XXX.XXX.XXX.XXX:2083/
- Use your domain name with the cPanel port number (2083) at the end of the URL. Like: https://vps.ggexample.com:2083/
Remember, your cPanel username and password are what you specified when setting up the account in WHM. You can log in to any cPanel account on your server using your WHM root password, but it’s better to log in using the account credentials.
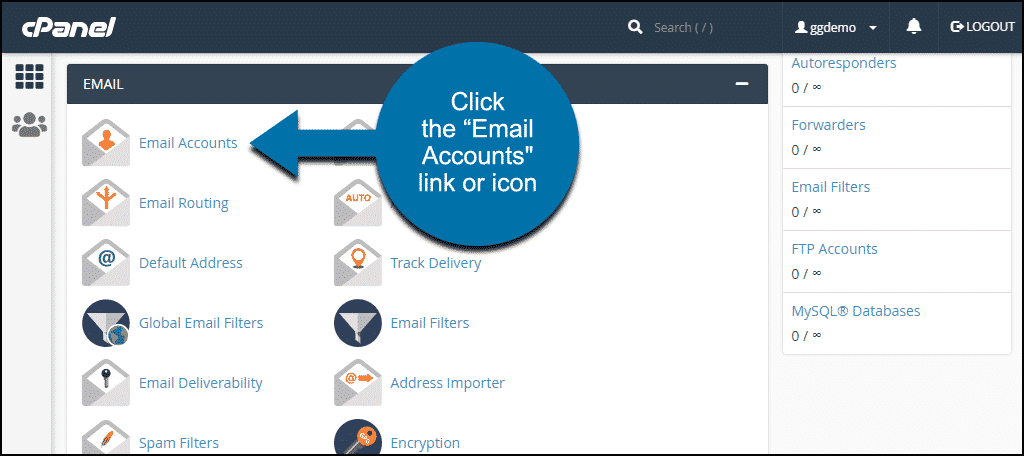
Once you’re logged in to cPanel, scroll down to the “Email” section and click the “Email Accounts” link or icon.
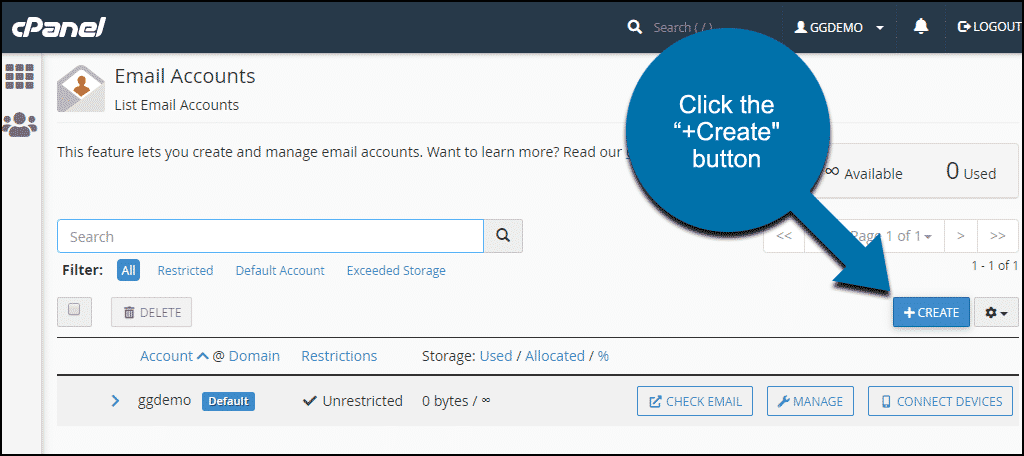
Click the “+Create” button.
Enter the username (the part of the address before the @) and password.
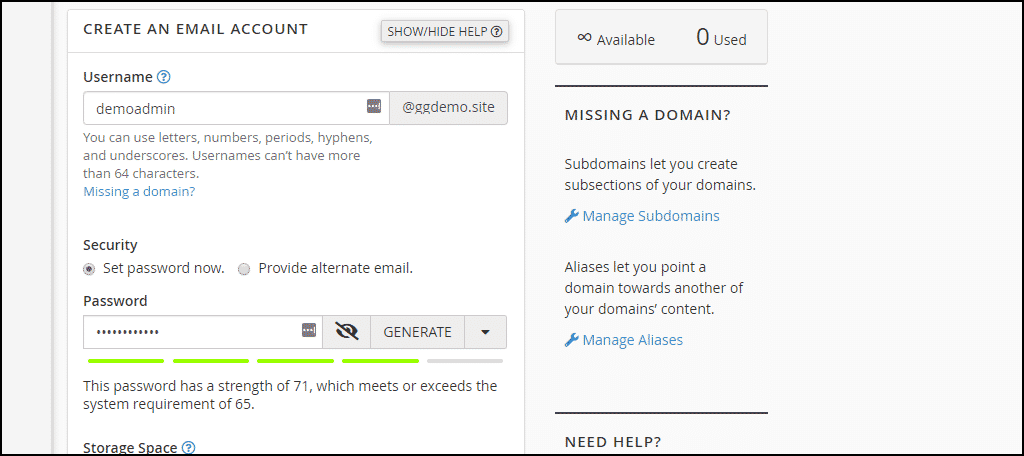
Set the storage limit for the email account. If you set a limit and the user’s mailbox exceeds the threshold, incoming messages will bounce back to the sender. A notice is sent from the system to the email account when quotas are exceeded.
Leave “Automatically Create Folders” in the “Automatically Create Folders for Plus Addressing” selection checked. If you don’t use plus addressing, no new directories will be created, so there’s no harm in leaving the option available.
Leave “Send a welcome email with instructions to set up a mail client” checked. It may seem counter-intuitive to send configuration instructions to an email address (don’t I have to configure an email client to read it?). But you can log in to webmail to get the configuration message, so it is useful.
Click the “+Create” button.

You can log in to webmail to pick up the configuration email from the “Email Accounts” page.
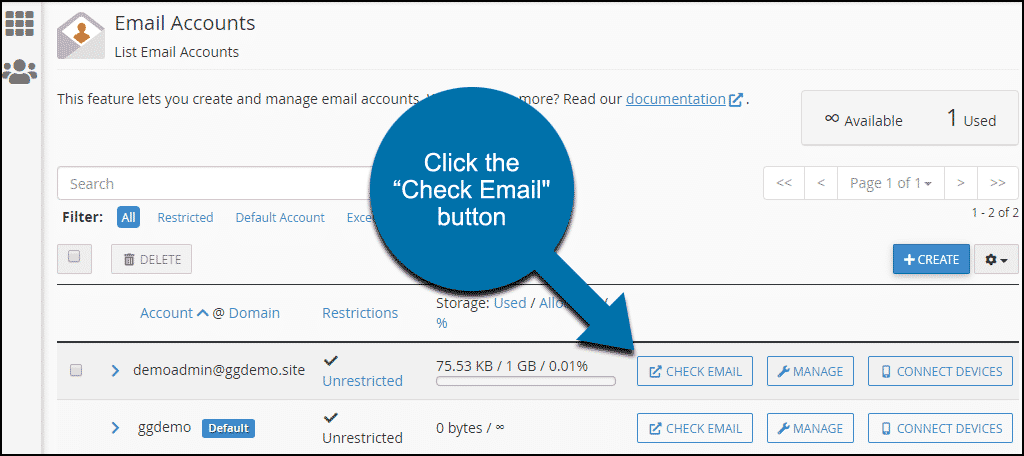
If you did not check “Stay on this page after I click Create,” you’ll be taken directly to the “Email Accounts” page after the address is created. Otherwise, you can get back there by going to the “Email” section and clicking the “Email Accounts” link or icon.
Click the “Check Email” button for the address you just created.
A webmail configuration page will open in a new browser tab. Choose the webmail client you’d like to use and click the “Open” button.
You’ll notice that configuration instructions are available on the webmail configuration page as well, under “Set up email on your device.” You can use that to send more detailed email client configuration instructions.

Accessing Webmail Outside of cPanel
You can use a few different URLs to access webmail from any browser.
- https://ggexample.com/webmail/
- https://webmail.ggexample.com/
- https://ggexample.com:2096/
Replace “ggexample.com” with your domain name.
If there’s an aspect of email setup that you didn’t find covered here, we have a more detailed cPanel email set up article available.
There’s Much More to WHM
Detailed WHM documentation is available on the cPanel website. We’ll also be adding articles for other WHM features in the future. If there’s something you’d like to see, let us know in the comments.